Week 1: Reading
Introduction to Collection and Curation
Part 1. Collection Techniques
There are many ways to collect insects, many of which do not require specialized or high-tech equipment; however, the ability to specialize in the type of insect desired by varying your collection technique. There are two main categories of insect collection techniques: active and passive collection. Active collection requires energy from the collector in order to be the most effective – that is, the collection must provide the impetus for collection. In passive collection, usually requiring a trap of some sort, there is no action needed other than simply placing the trap in an ideal position and waiting an appropriate amount of time. Read the following descriptions of active and passive trapping techniques, paying special attention to the types of insects that can be targeted with each method.
A. Sweep Net
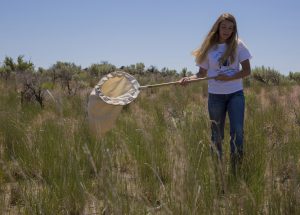
Sweep netting is one of the easiest ways to survey the insects and arthropods in a particular area while also enabling the collector to focus on a particular habitat type. A sweep net can be used to sample ground vegetation or to selectively target aerial insects, like wasps and butterflies (figure 1-1).
When used to sample vegetation, a collector can gain information on plant pest densities, diversity of insects using the vegetation as a host, and presence or absence of certain parasitoids of plant pests. In general, sweep netting is most effective when the collector uses a slightly slower-than-normal pace, moving forward continuously while sweeping the net from left to right in front of them, making sure to rotate the open mouth to strike the vegetation both ways with the bell extending behind. Often, the collector will alternate different vertical strata of the vegetation as well to collect insects that prefer the leaves as well as those that may gather on flowers or seed heads – as the net moves left to right, the collector will change the angle of the net to sweep the upper and lower parts of the vegetation evenly. When sweeping, it is important to strike the vegetation with enough force that insects will be dislodged, but no so hard that the vegetation is destroyed. Once the sample is complete, the bell of the net can be flipped over the mouth, or rim, preventing escape of collected insects until the net can be emptied.
B. Kick Net
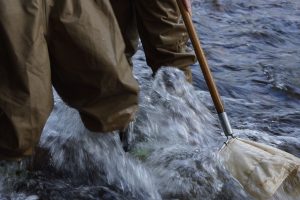
Kick nets are used for aquatic sampling: the net is shaped like a “D”, or often triangular, so that there is one flat side of the net that can be placed flush against the substrate at the bottom of a river or lake (figure 1-2).
Kick nets work most easily in flowing water. The sample site is approached from downstream, so as not to disrupt the sample site before the sample can be taken. The net is placed flush against the substrate with the mouth of the net facing upstream. It is best if the sample location has sufficient flow to hold the bell of the net open with the current; the current must be sufficiently strong that it can flow through the net without creating backflow, as this will rinse captured invertebrates out of the net as the sample is collected. Immediately in front of the net, large stones can be lifted (still in front of the net) and scrubbed by hand to dislodge any invertebrates into the current, carrying them into the bell of the net. Once all larger stones are scrubbed and moved out of the way, the collector can use the toe of a boot to agitate the smaller gravel or sediment substrate to dislodge the invertebrates preferring this type of habitat. This “kick-sample” can be timed to regulate sample efforts in several sites to compare results.
C. Beat Sheet

Beat sheets are used to collect insects in trees or hard-to-reach vegetation (figure 1-3). The idea is simple: a sheet is extended below the vegetation to be sampled, and the stems or branches with the desired arthropods are gently beaten, causing the vegetation to shake clinging arthropods loose. The arthropods should fall from the vegetation onto the beat sheet placed below, usually of a bright color to make the arthropods more visible, where they can be easily collected with forceps or an aspirator. As with the sweep net, it is important to use the correct amount of force with this technique to collect the highest number of arthropods possible while avoiding undue damage to the vegetation.
D. Leaf Search
It is very often that the search and collection of insects is for use in identifying pest or beneficial insects in crop systems, in which case methods that damage the vegetation in any way may not be the ideal method for sampling. These insects may also be quite small and easy to damage with a sweep net sample.
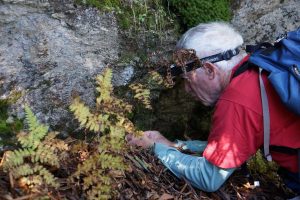
With delicate or small plants and insects, a simple leaf search is an easy way to collect and count insects, as well as establish plant-insect relationships and life cycle information. Many plant-feeding insects lay their eggs directly onto host plants, where there will be readily-available food resources for newly hatched larvae or nymphs. For many species, the eggs are easy to find as well, especially if the collector is careful to inspect plant crevices and the soil just beneath host plants (figure 1-4).
For this technique, gently inspect the upper surface of the leaf, disturbing it as little as possible. Then gently rotate the leaf at the stem, taking care not to dislodge any insects that may be on the underside of the leaf. Forceps or an aspiration can be used to collect, or if the insects are very small and fragile, a paint brush can be used to transfer insects into vials without damaging the specimens.
E. Pitfall Trap
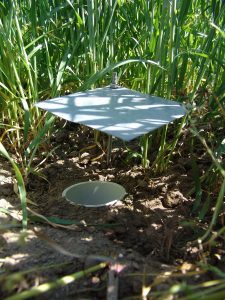
There are many nocturnal arthropods that are difficult to spot and capture either because they aren’t out during daytime sampling activities or because they are difficult to see in the dark when they are active. Additionally, many ground-crawling arthropods are difficult to sample in general without devoting a great deal of time to searching. For these, pitfall traps are useful for sustained sampling without a great deal of effort (figure 1-5).
Pitfall traps are simple to construct: a cup is placed into a hole dug in the ground, with the top edge of the cup level and in contact with the soil surface (not above – this may act as a barrier and discourage insects from walking into the trap). Insects that wander into the trap fall into the cup where they are trapped until the pitfall is recovered by the collector. For live catch, a deep, dry cup is ideal to prevent escape. If the arthropods need not be live, then 1-2” of water in the bottom of the cup with a few drops of soap to break the surface tension will ensure none escape. If water and soap is used, it is important that the trap be out no longer than 24 hours before recovery to prevent the insect bodies from breaking down in the solution. If the trap needs to be out for a longer period, a preservative should be used to prevent this from happening. Recreational Vehicle (RV) antifreeze containing propylene glycol evaporates slowly, can be reused and is reasonably environmentally safe for such needs. To protect captured insects and arthropods from birds, rodents and rain, it is also suggested to place some kind of cover over the pitfall trap, leaving at least 2” of space between the ground and the cover.
F. Berlese Funnel
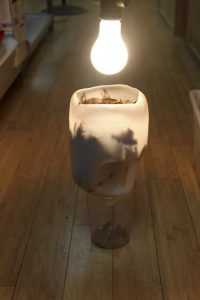
Many soil and leaf litter –dwelling arthropods avoid light and heat, as they require damp soil conditions to prevent their own desiccation. Many of these arthropods are also quite small, making soil samples difficult to process when searching for soil-dwelling pests and their natural enemies. Berlese funnels take advantage of the natural instinct of these organisms to avoid heat and light: a soil sample is collected and placed into the inverted funnel. A light is turned on above the funnel and left, slowly heating and drying the soil sample from the top down. As the sample dries, the arthropods move down in the soil profile until reaching the bottom of the funnel, falling through a screen into a collection jar or vial. The collection vial should have a few inches of ethanol or other preservative to prevent drying of specimens, and checked regularly to prevent evaporation. Berlese funnels are easily modified for use in a variety of sizes – a Berlese funnel can be constructed of nothing more than a desk lamp and 2-liter soda bottle (figure 1-6).
G. Light Trap
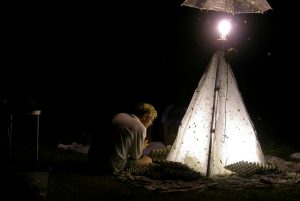
Many nocturnal insects are attracted to light; many that are not specifically attracted to light may move toward light in expectation of finding prey among those that are attracted to light. Light traps are an easy way to sample nocturnal insects – especially flying nocturnal insects – depending on the type of light used and the length of time the light is provided (figure 1-7).
Black lights are well known and often used to collect night flying moths. The most effective way to use this method is to shine a black light onto a hanging white sheet in an area where there is little to no competing light (including the moon – this works best in the two weeks either side of a new moon). The most mobile night fliers will arrive first, followed by those less mobile and the predators and parasitoids of night flyers. Trying different light types may yield more diversity in sampling. As insects come toward the light and land on the sheet, they can be collected with a net, aspirator or forceps.
H. Pan Trap/Bait Trap
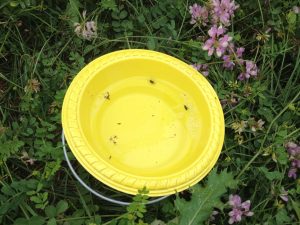
Attracting insects active during the day requires knowledge of specific biology. For example, bees and butterflies are attracted to certain colors, and thus colored bowls with water and soap solution can be used to attract and trap these insects. In greenhouses, thrips and other small plant parasites that are attracted to bright colors can be trapped using yellow sticky cards, an effective sampling technique used widely for monitoring populations. For pest insects more reliant on chemoreception to locate food or mating resources, there is a wide variety of pheromone traps commercially available. Many of these traps will kill the insects upon capture (drowning in solution), if not immediately then eventually (those stuck to the sticky glue in a pheromone trap will not live long). Using different trap types in different locations may receive different results, and can even be improvised using common materials – a strip of duct tape upside down on a card left out overnight is an effective general indoor trapping method for capturing spiders and other infrequently-encountered inhabitants of human structures (figure 1-8).
Traps can be modified to specify arthropods attracted – for example, placing carrion will attract a completely different assemblage of arthropods than pan traps.
Part II. Preservation
Once insects are collected, there are short-term and long-term methods for preserving specimens for curation.
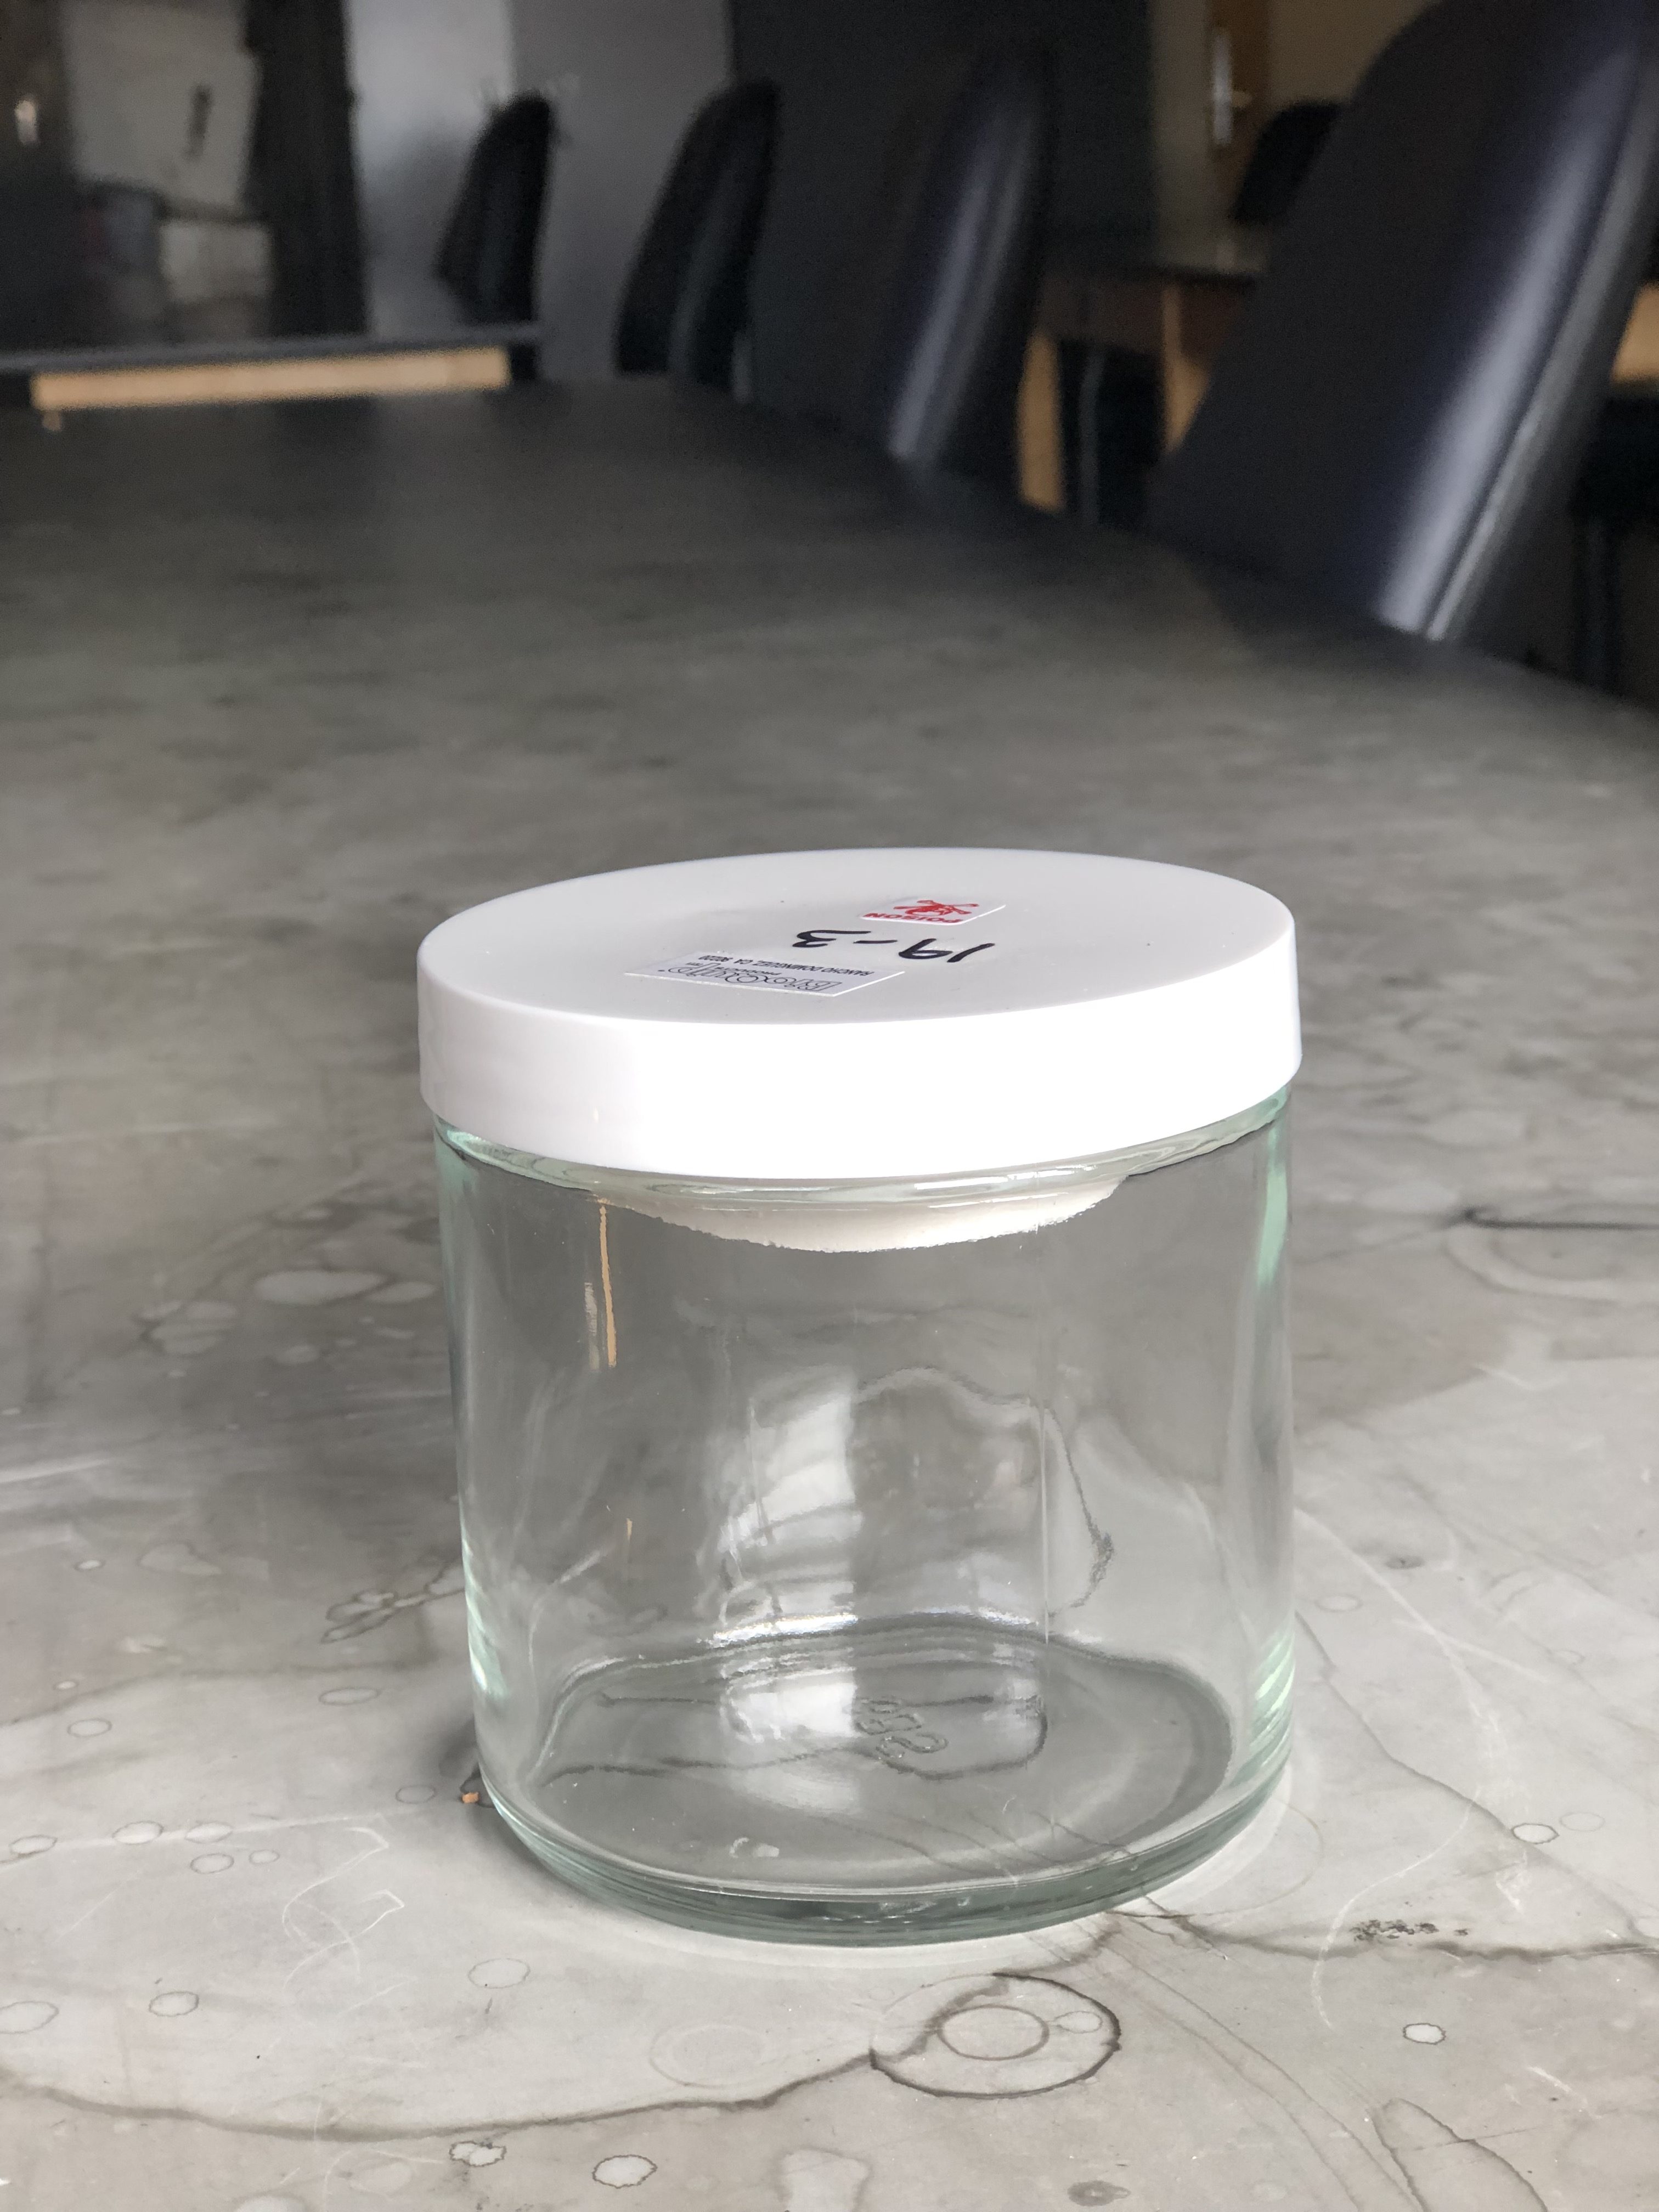
If insects are caught alive, it is best to have an ethyl acetate-charged kill jar available, as well as escape-proof vials, cups, or other storage containers (figure 1-9). Often, removing insects from a sweep net or live trap into a kill jar is the most difficult part of preserving specimens. The end of most nets are mesh and can be placed directly into a kill jar (provided the kill jar is large enough), and the lid screwed lightly down as far as possible should keep enough ethyl acetate around the specimen to cause temporary knock-down. At this point (usually 1-2 minutes), the specimen can be quickly removed from the net and placed into the kill jar, firmly closing the jar.
Once collection is complete, all specimens should be frozen within 12 hours to prevent fungal growth that will ruin the specimen, and to make sure the specimen is dead. Some beetle and spiders require a full 24 hours frozen to ensure death. Large, wet-bodied insects, i.e. Praying Mantis, should be frozen outside of a container to begin the drying process.
Specimens may remain in a freezer as long as needed, and following a freezing period most arthropods can be immediately pinned or placed into ethanol. Non-insect arthropods are always preserved in vials of ethanol, as well as soft-bodied, larval, or very small insects like aphids and midges. If the body of the arthropod is soft and fluid filled, it most likely will require preservation in ethanol. If the insect body has hardened cuticle, it will be preserved on a pin. General Rule: If you were to step on it, would it squish (ethanol) or crunch (pin)? Some larger insects (Large grasshoppers, mantids, large bot flies and horse flies) have enough oil and body water that they should be allowed to dry out for a few days before pinning. To prevent fungal growth, alternate 12-hr periods in and out of the freezer until sufficiently dry.
Materials: Preservative Ethanol should be diluted to a 70% for specimen preservation. If ethyl acetate is not available for kill jar charging, acetone-based fingernail polish remover is an inexpensive alternative, though it does not work as fast and will require more frequent re-charging. Kill jars can be purchased, but they can also be easily made with a jar and plaster of Paris. Once mixed, layer an inch of plaster into the bottom of the jar and allow to dry – having several kill jars available for use makes prolonged collecting easier.
Part III. Curation
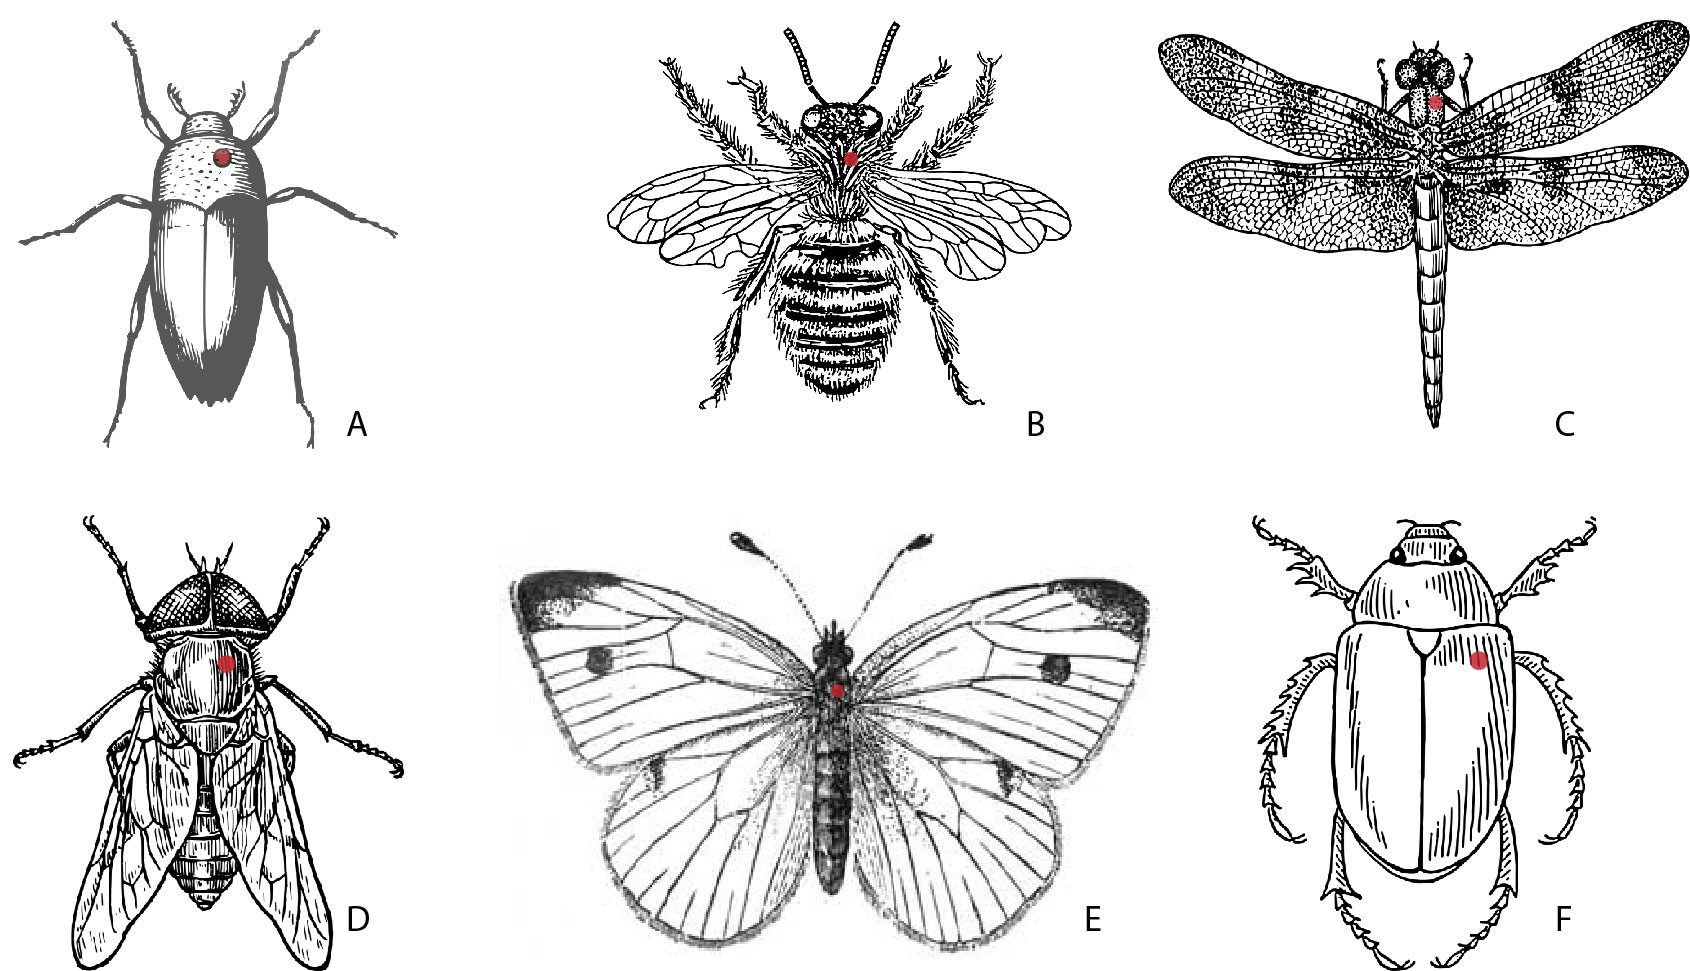
Pinning: In general, the pin is inserted into the second section of the thorax, though there are few exceptions. Insertion will be into the right side of the insect (from above) to make sure that at least one complete half of the thorax will be undamaged, preventing loss of structures used in identification. Pin position is indicated on the diagram below for the different insect body types (figure 1-10).
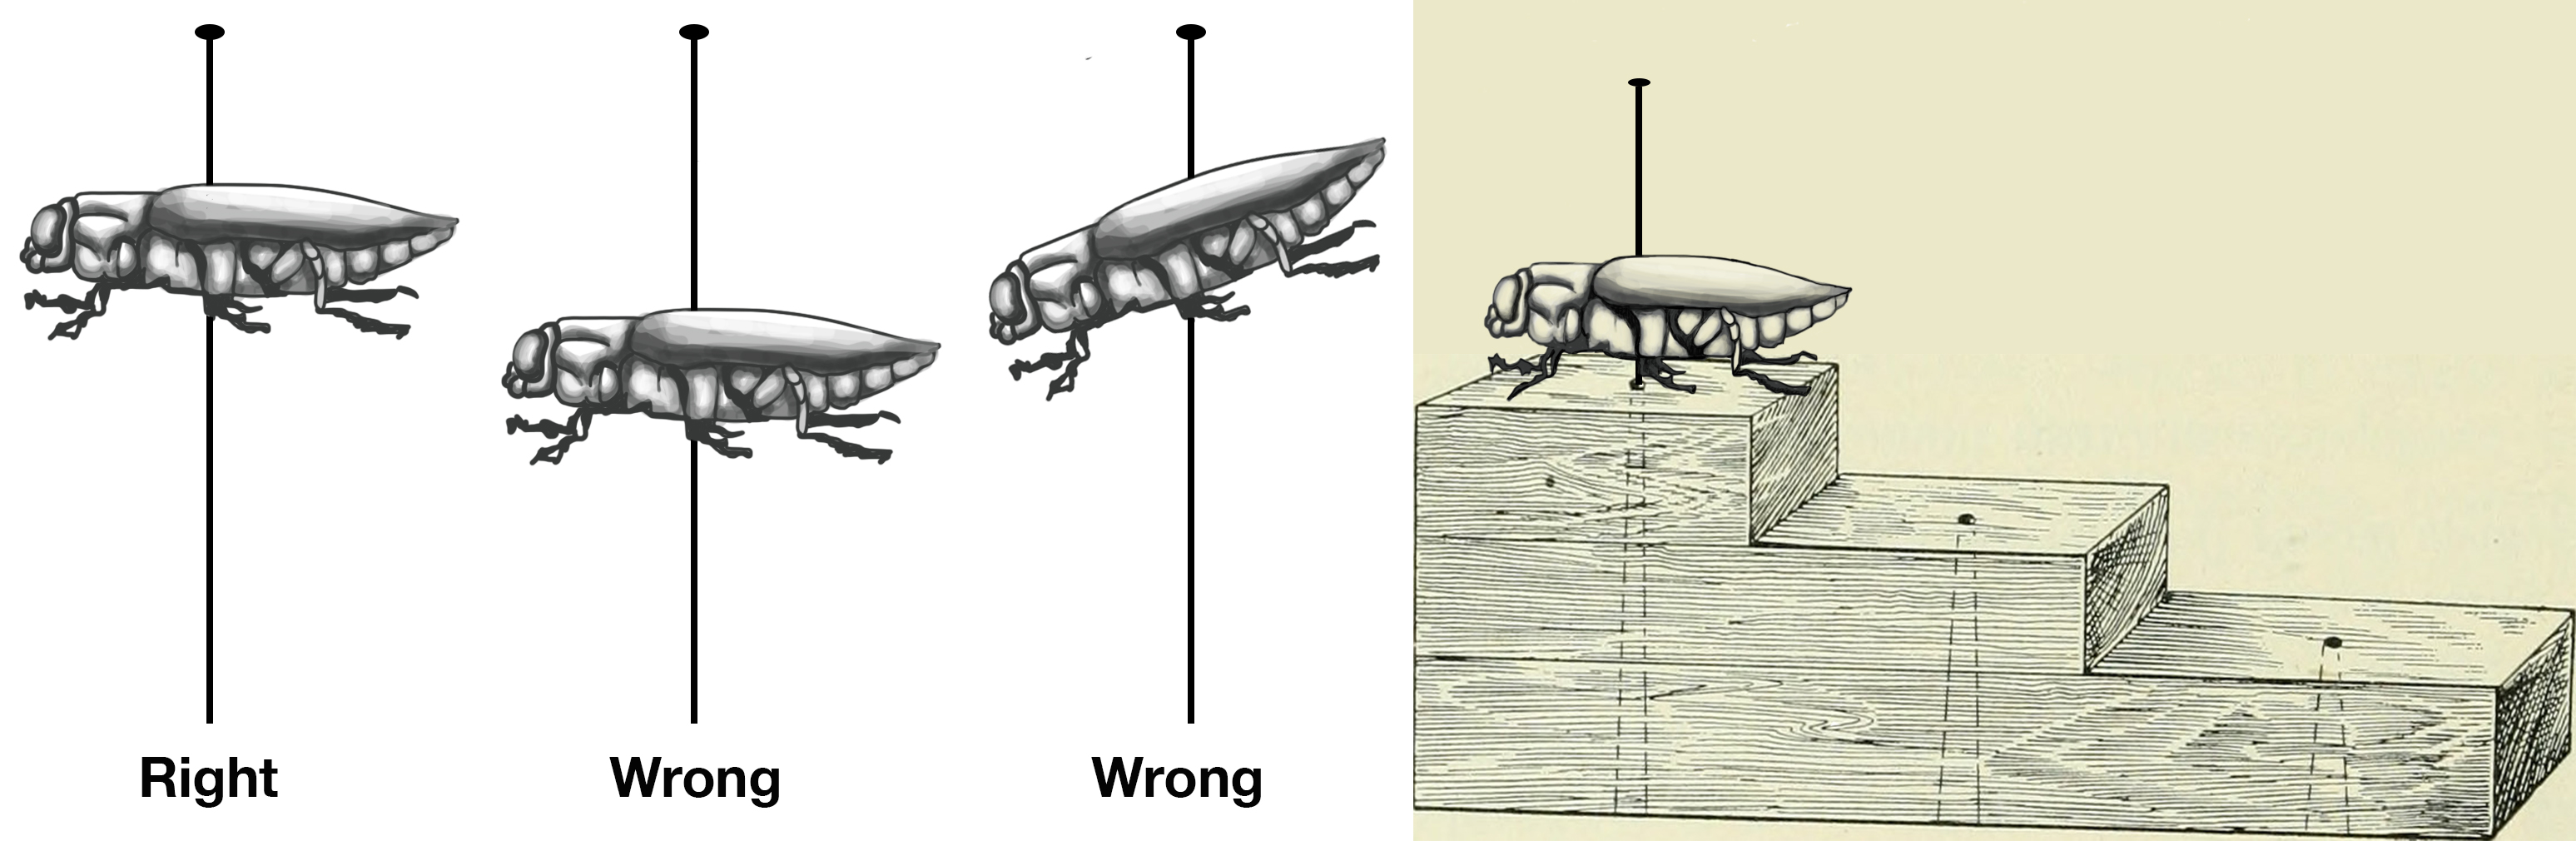
The height of the insect on the pin is easily spaced using a pinning block. Once the pin is in the correct position in the thorax and through the body, insert the point of the pin into the highest step of the pinning block and gently press. Make sure the insect is level on the pin, as shown below (figure 1-11) For larger insects, turn the pin upside-down into the bottom step of the block to make sure the body of the insect isn’t too close to the head of the pin at the top (figure 1-12).
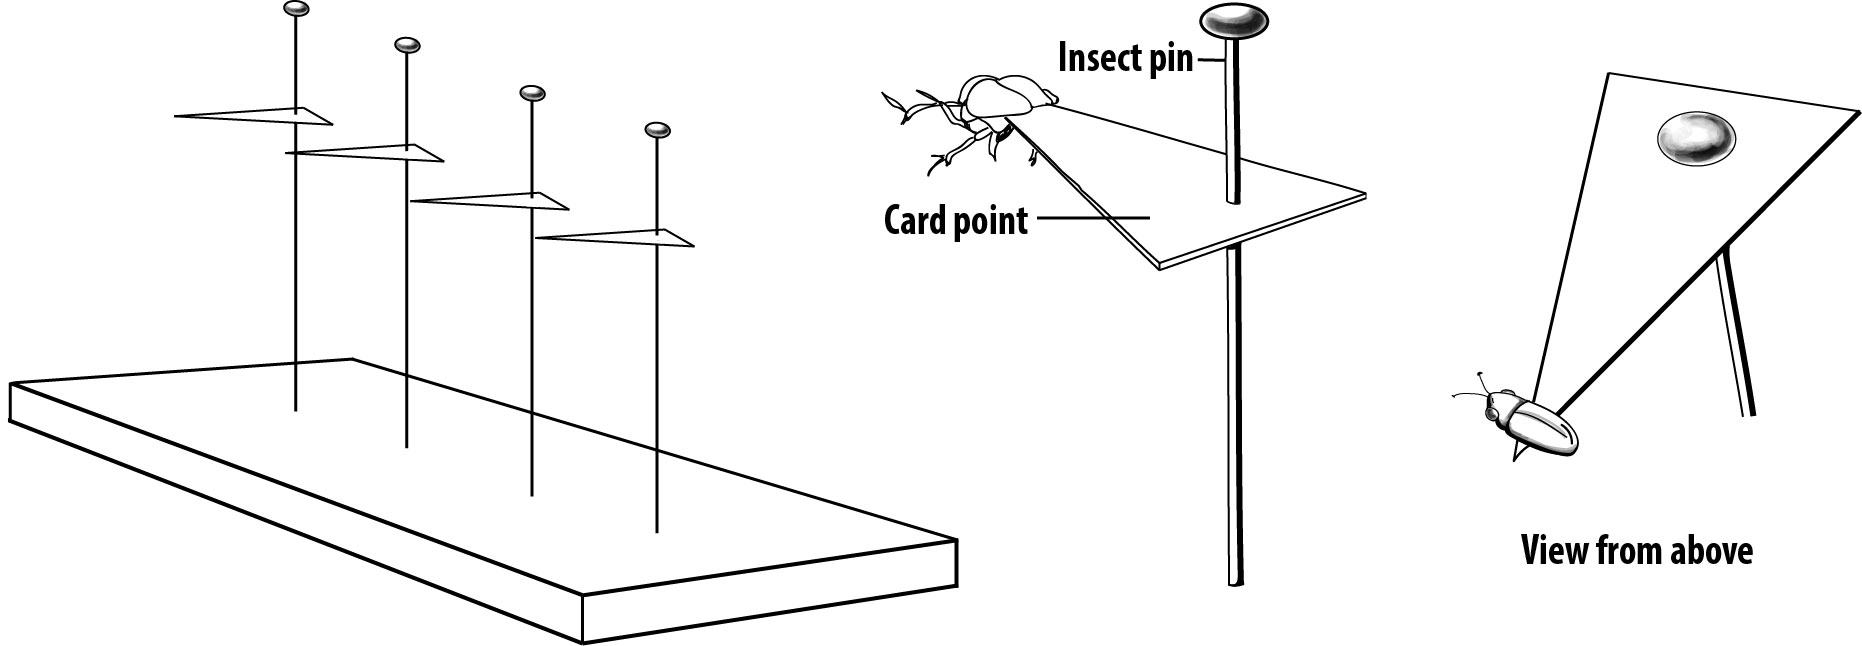
For insects that are too small to be pinned through the thorax without ruining the specimen, a pointed elongate triangle of paper is used. The wide end of the triangle is pinned, and the thin point is glued to the right side of the underneath of the second thoracic segment. Cardstock works best for durability, and there are specially made point punches for creating standard points (figure 1-13).
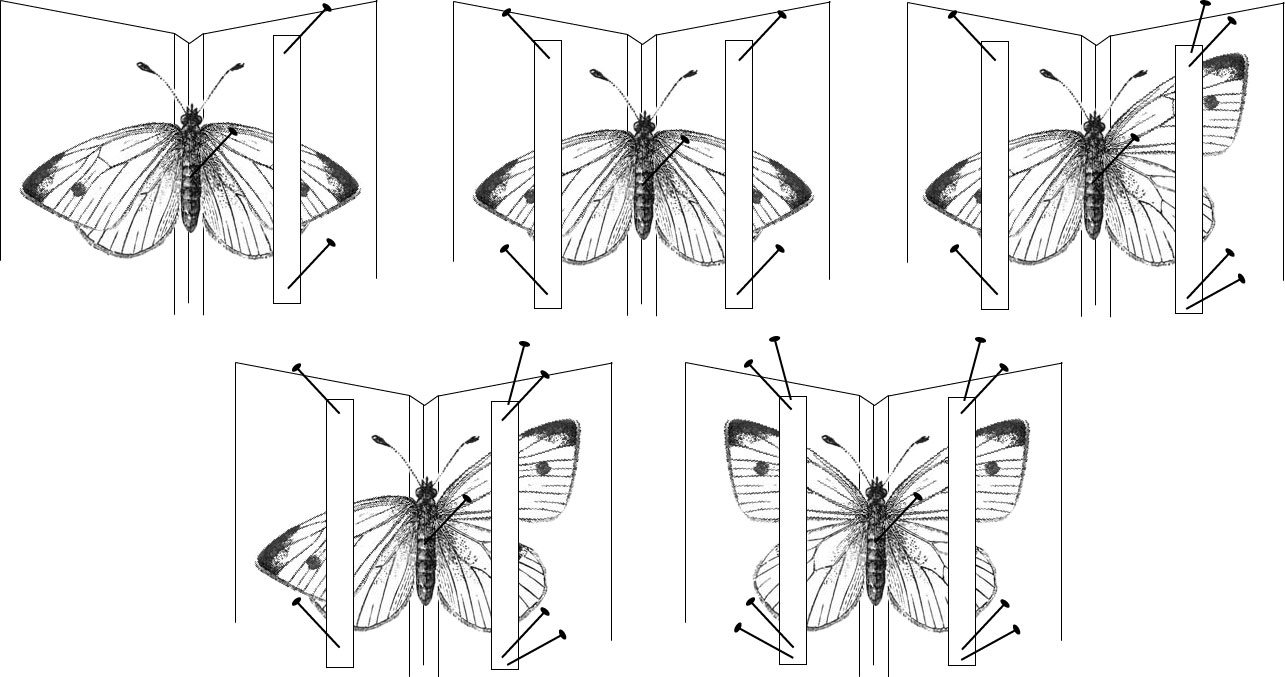
Insects with large wings are mounted with the aid of a spreader board, which allows the curator to gently spread the wings and secure them for the drying process. The body of the insect is inserted (on the pin) into the lateral groove in the board, and strips of paper are used to gently pull the wings to the board. Using the blunt end of a pin (to prevent tearing) to gently manipulate wing joints may be helpful. Once the wing is in the ideal position, pins are inserted into the strips of paper rather than the wings themselves to avoid damage (figure 1-14).
Ethanol storage: Non-insect arthropods, very small (too small to point), and soft-bodied insects are preserved in 70% ethanol. Only ONE kind of specimen should be placed in each vial. For large arthropods, such as large spiders, ethanol may need to be changed 2-3 times as materials leach from inside the body, causing the ethanol to cloud. For suspended or posed specimens, hand sanitizer can be used in the place of ethanol. In the case of large specimens where leaching is expected, hand sanitizer should not be used until ethanol storage ceases to cloud the fluid.
Labels


For pinned specimens, these labels can be created in a spreadsheet and printed for display. For ethanol specimens, the labels should be written in PENCIL on two sides of the same label rather than placing two separate labels into the vial. Labels should be INSIDE the vial with the specimen, not taped to the outside or otherwise displayed.
